From the procurement buyer standpoint, a solenoid is never a simple component but the reliability point of the whole system. Procurement and technical buyer experience downtime, productivity losses, warranty problems and customer complaints due to the solenoid failure in industrial automation, fluid controls, medical devices, automotive systems and OEM machines.The question on solenoid failure that have to be answered for any buyer and procurement engineer while considering a solenoid supplier are obvious but important:How long will this solenoid last in real conditions?
Which solenoid failure can we expect?
What is the effectiveness of troubleshooting?
What is the real cost of downtime versus the cost of the component?
The following guide is written from the procurement perspective and provides the examples of real-life solenoid failures and troubleshooting in the industry.
Chapter 2 : Solenoid Failure & Real Life Applications
Solenoid is the type of electro-mechanical actuator which transforms electrical energy into linear motion. The principle of operation of a solenoid is very simple but the number of challenging factors that a solenoid faces during its operation is great: heat, dust, moisture, vibrations and frequent switching cycles.
There are five major types of solenoid failures that can be expected by any procurement buyer:
Power Failure
Mechanical Malfunction
Overheating and collapse
Fluid contamination failure (valve solenoids)
Installation or system mismatch failure
Comprehending the types of soleanoid failures listed above will allow procurement engineers to eliminate long-term operational risks and choose the most reliable solenoid suppliers.
Chapter 3 Types of Most Common Solenoid Failure
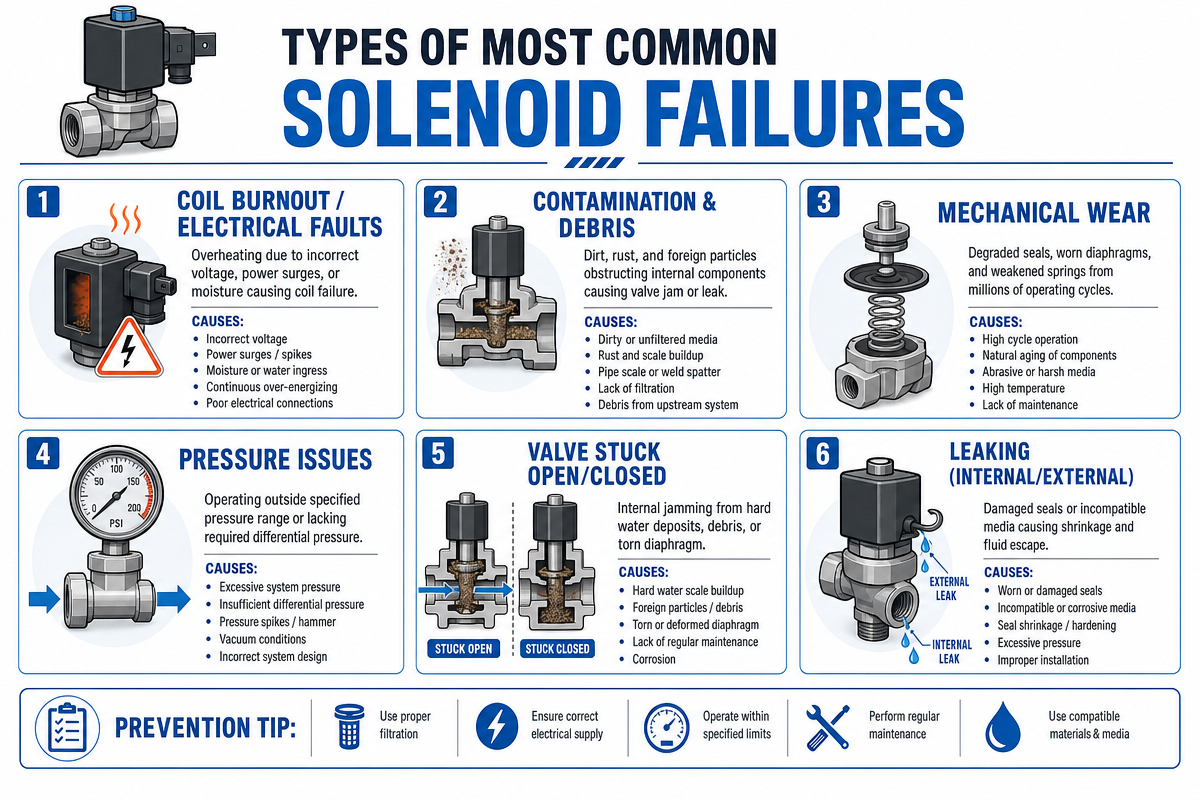
3.1 Coil Burnout (the worst possible failure)
What happens?
The coil heats up and finally burns out.
Impact on buyer:
Complete replacement of the component
System shut down possibility
Expenses for warranty claims and service
Reasons:
Over-voltage / unstable power supply
Excessive energizing beyond duty cycle limitation
Poor design for heat dissipation
High ambient temperature
Buyer’s insight
Mostly it’s a design-related issue rather than the problem of the misusage by the end-user. ALWAYS CHECK:
Duty cycle (ED%)
Coil insulation class (A, B, F, H)
Report about thermal rise test
3.2 Armature Jamming/Sticking
What happens:
The plunger (armature) operates incorrectly.
Impact on buyer:
Intermittent performance
Lower reliability rate
User complaints
Reasons:
Contamination with dust and particles
Corrosion inside the solenoid
Incorrect assembly
Incorrect materials usage or surface treatment absence
Buyer’s insight
Mainly applied to industrial and fluid control systems. Priority should be given to:
Stainless steel armature option
IP rated seals
Anti-corrosion surface treatment
3.3 Insufficient Actuation Force
What happens:
The solenoid is energized but the required force is not provided.
Impact on buyer:
Poor system performance
Service expenses
Incorrect identification of electrical failures
Reasons:
Incorrect voltage/current supply
Magnetic circuit limitations
Air gap or misalignment
Overload spring/ mechanical impedance
Buyer’s insight
Very often it is a result of incorrect selection/integration, not a solenoid failure. ALWAYS check:
Force vs stroke curve
Safety Margin at least 20-30%
Voltage stability
3.4 Overheating During Service
What happens:
The solenoid gets overheated.
Impact on buyer:
Reduced lifetime
Unsafe conditions in confined spaces
Increased maintenance frequency
Reasons:
Exceeded duty cycle
Limited ventilation/informational space
High ambient temperature
Poor coil design
Buyer’s insight
ALWAYS ask for:
Temperature increase data
Validation report about duty cycle
Real-life usage case studies
3.5 Electrical Connection Loss
What happens:
The solenoid works intermittently or doesn’t work at all because of loose wires and terminals.
Impact on buyer:
Additional expenses for field service
Misdiagnosis of system problems
Poor product confidence
Reasons:
Loose connections
Poor soldering
Vibration fatigue
Poor cable insulation
Buyer’s insight
In industrial environment the quality of the connection is as important as the coil design. Consider:
Industrial grade connectors
Connector design, strain relief
Vibration test
Quick Field Test on Solenoid failure cause
| Test | What to Check | Interpretation |
| Voltage measurement | Rated voltage under load | Low voltage = system issue |
| Coil resistance test | Multimeter reading | Infinite = open coil |
| Audible click | Activation response | No click = failure |
| Manual plunger movement | Free movement | Sticking = mechanical issue |
| Swap test | Replace with known good unit | Confirms component vs system fault |
Chapter 4 : How Do I Know That My Solenoid is Faulty?
A solenoid usually gives out clues of its malfunctions that can be revealed visually or using simple testing procedures.
4.1 Symptoms on Solenoid Failure
Unusual Sounds: The most common sign is a fast clicking sound or, conversely, complete silence at the moment when the solenoid should work. A buzzing sound coming from the solenoid usually indicates the problem with the battery (its charge is low).
Inability to Work Properly: It becomes clear that the solenoid does not function when the engine cannot start, the valve does not close/open, etc.
Intermittent Behavior: Sometimes a solenoid works fine and sometimes does not. Such intermittent behavior is common in the case of worn-out contacts of a solenoid.
4.2 Testing on Solenoid Failure
Checking the Sounds: When electricity is provided, you should hear a click as the plunger starts moving. In case you don’t hear anything – your coil is probably burnt out or the solenoid itself is jammed.
Checking the Voltage Level: It is necessary to check whether the voltage of your power source corresponds to the nameplate data of the solenoid (+10% to -15%). Inadequate voltage can lead to inability to switch on the solenoid or to its overheating.
Resistance Check: The simplest way to test the condition of a coil of the solenoid is to check its resistance. In the case of “open circuit” (infinite resistance) or “short” (zero resistance) – you have to change your solenoid.
The “Bypass Test”: If we speak about a starter solenoid – it is possible to bypass the solenoid by connecting two big terminals with a screwdriver or piece of metal. The fact that in such situation your starter starts spinning proves the malfunctioning of the solenoid.
4.3 Visual Indicators on Solenoid Failure
Overheating: You can find out that your coil is burnt out from some burns, discoloration, melting (“the bobbin”) of the solenoid. However, be aware that the solenoid which is hot to the touch can work according to its specification.
Damage or Corrosion: Cracked housing, corroded terminals or water ingress that can provoke the short circuit of the solenoid.
Chapter 5 : Solenoid Troubleshooting Guide (Step by Step)
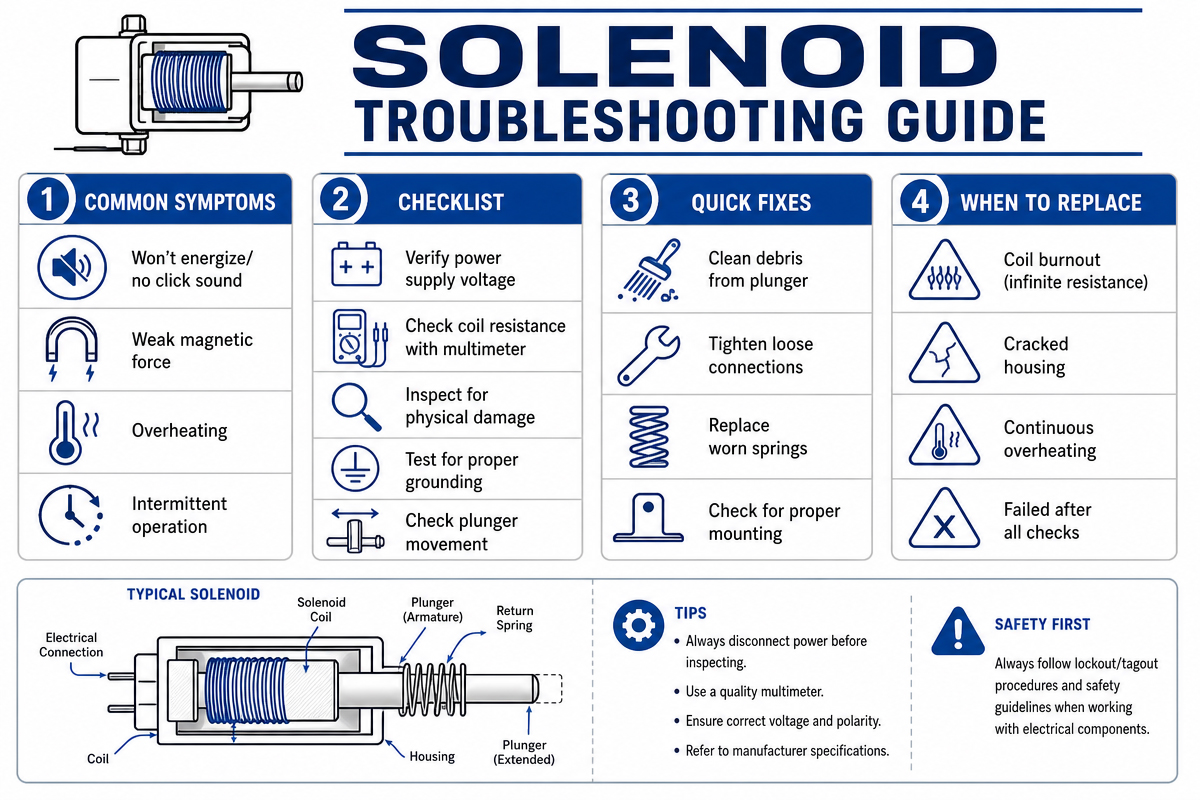
5.1 : Check the Power Supply First of all, measure the voltage on the terminals
Rated voltage under load
Voltage drop check
Bottom Line: for buyers – MOST failures are the power supply failures not the solenoids.
5.2: Measure coil resistance.
Infinite resistance – open winding .
Very low resistance – short circuit
Small deviation – normal aging process
5.3: Look for Mechanical Movements
The plunger should work easily
Checking for corrosion and contamination
Identifying the points of friction _
5.4: Verification of Temperature Conditions
Operational temperature
Duty cycle verification
Ventilation verification
5.5: Check for Load Mismatch
Is there too much spring force?
Hydraulic or pneumatic overload
Wrong stroke configuration
5.6: Swap with the Known Good Solenoid
If everything is alright, replace the solenoid with the known good one to find out the problem.
Chapter 6 How to Avoid Solenoid Failure Before Purchasing
6.1 Full Technical Documentation Required
Force Stroke Curves
Duty cycle ratings
Thermal performance
Life cycle testing
6.2 Evaluation of Material Quality
Coil insulation quality
Armature material
Compatibility of seals (NBR, FKM, EPDM)
6.3 Application References Requested
Industrial Applications
Integration History into OEM equipment
Long-term performance data
6.4 Production Consistency Confirmation
Batch testing
ISO Certified Production
Pre-shipment electrical testing
6.5 Total Cost of Ownership (TCO) approach
Cheap solenoids will result in:
High replacement rates
High rates of downtime
Warranty problems
Chapter 7: Checklist for Buyers before Choosing a Solenoid
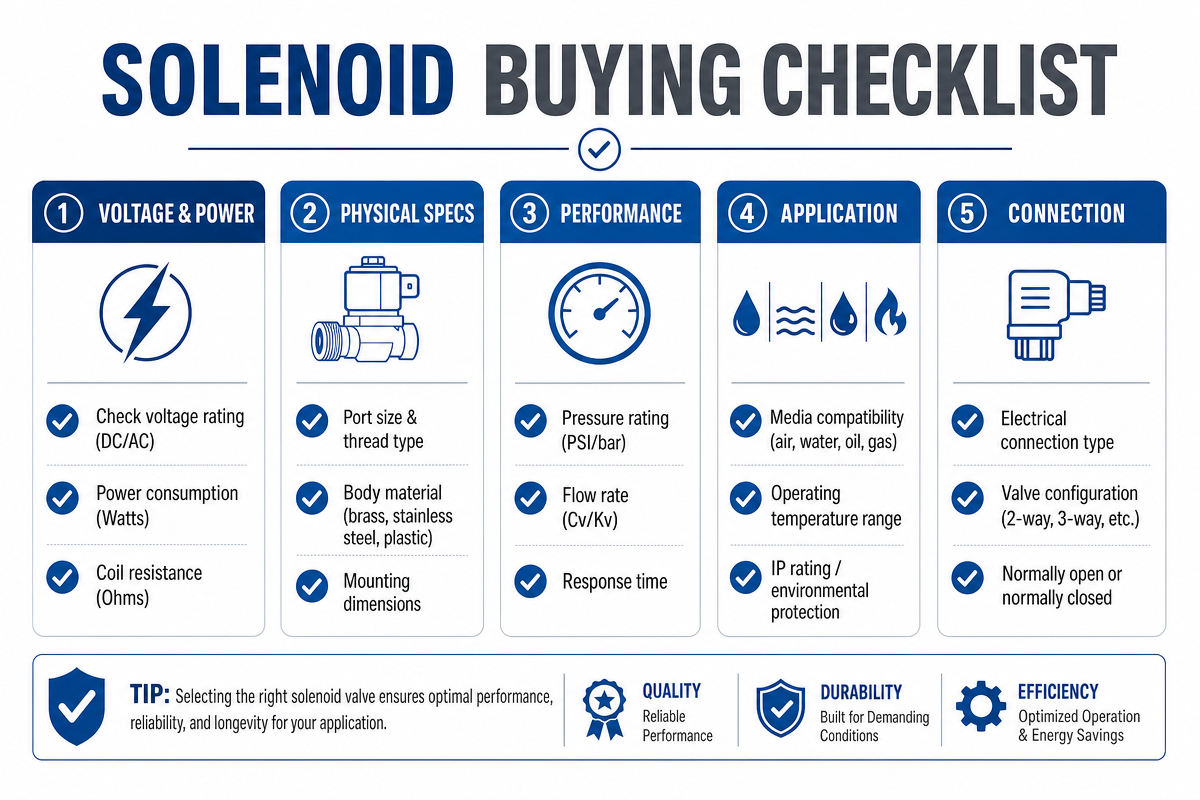
In respect of procurement and maintenance of the solenoid it should never be done based on price and basic specs only. Solenoid is a critical component and incorrect choice will lead to overheating, wear, downtime and expensive failures. The checklist below will help buyers and procurement engineers to assess the reliability of the solenoid before purchase in a structured way.
7.1. Correct Duty Cycle for Application
Make sure that the duty cycle (ED%) of the solenoid fits the application conditions. Solenoids are designed to be used in continuous duty applications when the component is energized continuously. The intermittent-duty designs should be selected carefully in order to avoid overheating and coil burnout.
7.2. Verification of Thermal Test Data
Ask for the verified data on temperature rise test under rated load. It will ensure safe operation of the solenoid within thermal limitations in confined or high ambient-temperature environments.
7.3. Mechanical Endurance Lifecycle Verification
Make sure that the solenoid was tested with mechanical endurance cycles under real load conditions. The good supplier will provide the proof of life cycle of the component and thus confirm its reliability in long-term usage.
7.4. Verified corrosion resistance
In case of industrial, outdoor or fluid contact applications make sure that the solenoid utilizes stainless steel components, anti-corrosion surface treatment and appropriate seals like NBR, FKM or EPDM.
7.5. Force Curve Availability
Full force-stroke curve is required in order to fit the load requirements of the solenoid. The buyer should make sure that there is a safety margin of at least 20-30% between available force and load.
From the procurement and maintenance point of view, the troubleshooting must be systematic. Below there is a practical field guide.
Chapter 8 : Best Practices and Preventive Maintenance on solenoid failure
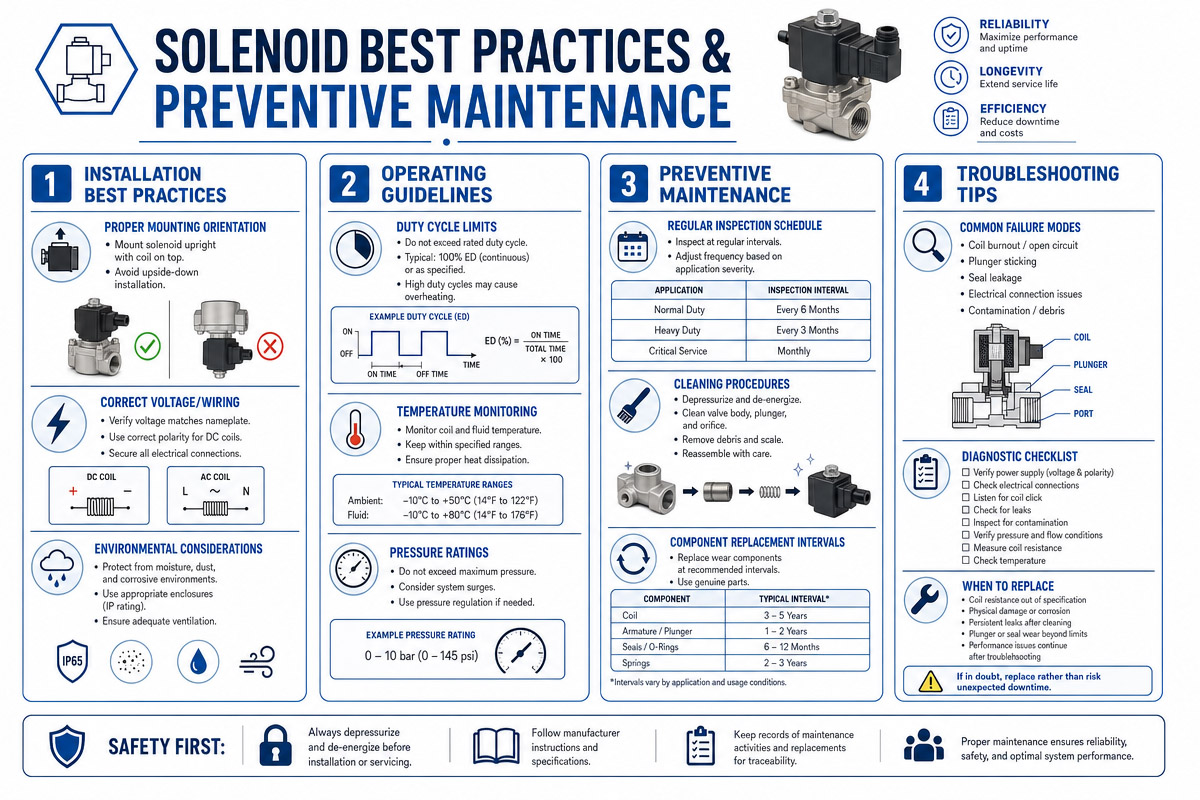
8.1 Solenoid failure on Preventive maintenance
Preventive maintenance is one of the best strategies to ensure the reliability of the solenoid and to avoid unexpected system downtime. From the maintenance and procurement perspectives, the majority of solenoid failures are not sudden but are gradual failures developed over time due to environmental stresses and/or incorrect operating conditions which can be forecasted.
8.2 Regular Cleaning on Solenoid failure
Regular Cleaning and Inspections Regular inspections should be carried out to identify any signs of wear, contamination or overheating. Contamination and fluid residues gradually may influence the movement of the plunger and coil operation. Regular cleaning of the solenoid housing and the identification of unusual sounds, vibrations or discoloration of the components will serve as an indicator of the problem before the failure happens. Preventive inspections significantly reduce the chance of the unexpected failures in industrial systems.
8.3 Correct Sizing and Installation
Correct Sizing and Installation Correct sizing of the solenoid for a particular application is crucial. Overload and incorrect stroke configuration will lead to inefficient actuation or even premature mechanical wear. Proper installation will prevent sticking of the armature and even distribution of the magnetic forces. Before the installation, check carefully the voltage compatibility, load requirements and mounting conditions.
8.4 Environmental Protection
Environmental Protection (Moisture, Dust, Heat)
Environment is one of the most frequent sources of solenoid failures. Moisture causes corrosion, dust leads to jamming, and overheating accelerates the breakdown of coil insulation. Selection of the appropriate IP-rating, corrosion-resistant materials and thermal protection is especially important in harsh environments.
8.5 Scheduled Maintenance
Scheduled Maintenance Intervals • Preventive maintenance should not be reactive. Based on the duty cycle, operating environment and criticality of the system the maintenance interval should be planned. High duty and continuous duty applications require more frequent checking and low duty applications require occasional checking. Planning of the preventive maintenance schedule ensures the stable performance, reduces the downtime and extends the service life.
Apart from the solenoid reliability assurance, preventive maintenance strategy reduces the total cost of ownership and improves the system stability in the long run.
Chapter 9 :WEILONG COMPANY CAN HELP YOU FIND THE RIGHT SOLENOID
Weilong Intelligent Technology is a solenoid . solenoid valve and inductor coil professional developer and manufacturer of the wide variety of solenoid solutions applicable for various applications ranging from precise medical equipment to extremely harsh industrial environments.
The company provides miniature plastic pneumatic solenoid valves which are used in the respiratory therapy and medical equipment applications which require high precision, stability and low power consumption. On the other hand, the company produces highly robust high-pressure and high-temperature hydraulic solenoid valves designed for industrial applications and operating deep underground in oil and gas extraction environments.
Due to the wide engineering experience the company can provide services for various industries including industrial automation, medical technology, automotive systems, fluid controls and OEM machinery. In any case, every application has its own challenges in terms of duty cycle limitations, environmental exposure, pressure and lifetime requirements. Our engineering team works with the customers to ensure that each chosen solenoid is perfectly suited for its environment to avoid the risks of the early failures and downtime.
Our team can help you to estimate your technical requirements and to give professional advice on the selection of the optimal model in terms of force, stroke, voltage, temperature range, sealing and lifetime. If you are looking for a reliable solenoid or valve solution, Weilong can help you. “We don’t just sell components, we help customers increase their system reliability and reduce total cost of ownership.”
If you want to know more about the capabilities of Weilong Company in terms of solenoid please contact our sales engineering team. We are ready to provide you technical consultation, product selection and customized solution development.
If you are new in the world of solenoid technology or just want to learn something new, we provide you with the educational resources on solenoids including solenoid basics, failure analysis and selection and maintenance best practices.
Selection of the right solenoid is not just a purchasing decision but the engineering one which directly affects the performance, safety and efficiency of the system.
Chapter 10. Solenoid Failure FAQs ?
10.1. What is the most common cause of solenoid failure?
The most common cause of the solenoid failure is the burnout of the coil due to the plunger failing to close. When a solenoid is powered on, it initially attracts an enormous “inrush” current which should drop when the plunger closes. If the plunger does not close or cannot close completely, this high current remains constant and causes overheating and burnout of the coil. The burnout of the coil accounts for a significant percentage of all solenoid valve failures
10.2. My solenoid doesn’t open. What should I check first?
First thing to do in this case is to check the power supply. You should use a multimeter to check the voltage and frequency which should comply with the specifications on the valve nameplate and should be in the acceptable tolerance (usually 10% higher to 15% lower than the rated voltage).
Coil: Check the coil’s resistance. An open circuit (infinite resistance) indicates a burned-out coil
Debris: Foreign material such as pipe dope, Teflon tape, or rust particles can jam the plunger and prevent it from opening.
Pressure: Ensure that the system maintains the necessary pressure differential in order to open the pilot-operated valve
10.3. My solenoid doesn’t close. Why?
A valve that does not close is typically a mechanical problem.
Debris or contamination: Particles jam the valve seat or the pilot hole, preventing the valve from closing.
Damaged components: Worn or torn seals, diaphragms, or a broken return spring can also prevent the proper closure.
Pressure: If the pressure differential across the valve is too high or too low, it will negatively affect the valve closure.
10.4. What are the symptoms of a burned out in the coil of solenoid failure?
A coil burnout can be identified with:
Visual inspection: Discoloration, burn marks, or melted bobbin material
Smell: A distinctive smell of burning.
Electric test: A multimeter reading infinite resistance (an open circuit) or zero resistance (a short circuit).
Operation: The valve does not actuate when powered on.
10.5. Can the overheating damage a solenoid, and how can I avoid it?
Yes, overheating is one of the main sources of the failure. Contributing factors to overheating include:
High ambient temperature: It reduces the cooling capacity of the coil
Rapid cycling: It creates overheating faster than it is dissipated.
Overvoltage: It causes high holding current
High duty cycle: Operating the solenoid valve beyond the specified “on” time
To prevent the overheating, you should ensure that the operating environment is within the specifications of the valve and that the cycling rate corresponds to the coil’s duty cycle.
10.6. How does the contamination lead to solenoid failures?
Contamination is one of the most frequent reasons of the valve failure accounting for up to 30% of the valve issues
Mechanical jamming: Dirt, dust and metallic particles accumulate and jam the plunger or spool, causing slow or failed actuation
Leakage: Abrasive particles wear down the seals and diaphragms, causing leakage
Short circuits: Water-based coolants with metal particles can create short circuits in the coil leads
Installation of the strainer or filter in the upstream is an essential preventive measure
10.7. What is the role of the power supply in solenoid failure?
Voltage mismatch is one of the common causes of the problem:
Low voltage: Low voltage prevents the plunger from creating enough force to close the valve resulting in constant high inrush current and burnout of the coil
High voltage: This situation is rare but it causes excessive holding current which gradually overheats and burns the coil
Incorrect power: Usage of the AC power on the DC solenoid (or vice versa) leads to the valve malfunction or failure
Always make sure that the power supply corresponds to the valve specifications provided on the nameplate.
10.8. How can I systematically troubleshoot the suspected solenoid failure?
A systematic, step-by-step procedure is the best choice:
Visual Inspection: Check for any signs of physical damage, burn marks, loose connections, and contamination.
Electrical Test: Use a multimeter to verify the voltage and test the coil for continuity (open/short circuit)
Mechanical Check: Disassemble the valve (depressurizing it and disconnecting power supply) to inspect the plunger, valve seat, springs and seals for wear or contamination.
Valve Isolation: Manually actuate the valve (if a manual override is available) to determine if the problem is mechanical or electrical.
Chapter 11 : Conclusion on Solenoid Failure and Troubleshooting
11.1 common Solenoid Failure
The vast majority of solenoid failures are not random “bad luck” but are predictable consequences of three core issues: electrical stress, mechanical contamination, and environment.
The root cause can almost always be traced back to one of these three factors:
Electrical failures (burnt coils, shorts) are caused by voltage mismatch, overheating due to rapid cycling or inability of the plunger to seat which puts the coil in a high-amperage “pull-in” position until it burns.
Mechanical failures (jamming of the plunger, leakage, failure to open or close) are usually caused by contamination (dirt, metal shavings or Teflon tape from the installation) and wear of seals and springs.
Environmental effects (contamination, overheating, corrosive atmosphere) accelerate both electrical and mechanical failures.
11.2 The Key Principle of Troubleshooting
The most important principle in troubleshooting is isolation. Before concluding that the coil is burnt, you should isolate the problem:
Isolation of electrical problem from mechanical: Use a multimeter to check the voltage and resistance of the coil. If the coil is electrically sound, the problem is mechanical. If the coil is burnt, you should identify the reason for burning (low voltage? jammed plunger? etc.) before replacing the coil.
Isolation of the valve from the system: During the troubleshooting disconnect the valve from the process line and power supply and manually actuate the plunger (if available) to see if it moves freely. This will help you to understand whether the problem is caused by the debris or pressure differences.
11.3 The Bottom Line: Prevention Over Repair
A successful troubleshooting demonstrates that most of the failures are preventable, not just repairable:
Filtering of the fluids upstream is the most cost-effective preventive measure to prevent mechanical jamming.
Proper voltage regulation and adherence to the duty cycle of the coil (maximum “on/off” times) is mandatory for electrical longevity.
Regular visual inspection for burn marks, corrosion, or loose wires can prevent 80% of the potential failures.
Final verdict: If you approach the failed solenoid not as a “replacement part” but as a symptom of the system issue (dirty fluid, incorrect power supply, or overheating) you will not only solve the problem but will also eliminate its source, increasing the service life of the new solenoid.